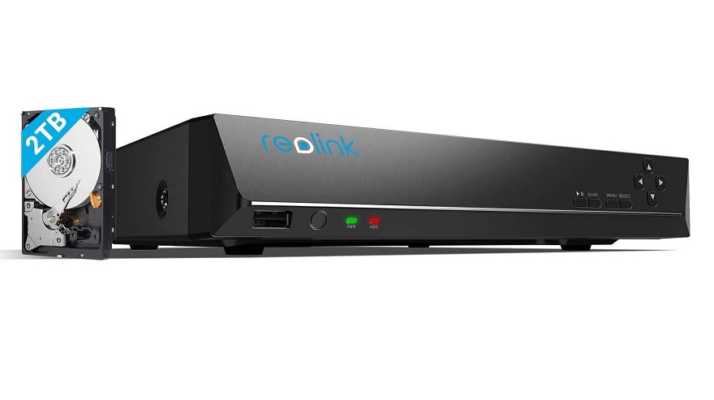
View your security camera system locally by connecting to a monitor or a HD TV, or via free Reolink App and Client on your mobile devices & computer or a web browser remotely. A real plug and play network video recorder! This RLN8-410 NVR features PoE (Power over Ethernet), with a single network cable connecting each of your IP cameras to the NVR for both power supply and video signal transmission. Easy wiring – the wiring process can’t be simpler for DIY enthusiasts. Find more in Reolink PoE NVR 8 Channel Home Security Camera System review.

Key features:
- 4MP/5MP HD outdoor cameras
- 8-channel NVR controls up to 8 cameras with built-in 2TB (2000 Gigabytes) hard drive storage
- Motion detection & notification (push & email)
- Night vision capability (up to 100ft)
- Audio available (built-in microphone)
- Live streaming & remote access (iOS, Android, PC Windows, Mac, Web Browsers)
- Support 24/7 non-stop recording
- PoE, simple installation, plug & play
- Support third-party software like Blue Iris/ Milestone/ iSpy/ Synology/ QNAP
What is good in Reolink PoE NVR 8 Channel?
Work with Reolink 5MP/4MP Cameras
This Reolink RLN8-410 8-channel PoE NVR supports both 5 megapixels and 4 megapixels resolutions. It works perfectly with all our 5MP/4MP PoE IP cameras for 24/7 recording, motion detections, live views, playback and more features.
Supported Reolink 5MP/4MP IP cameras include: RLC-410-5MP, RLC-420-5MP, RLC-423, RLC-410W, RLC-511, etc.
*The Reolink NVRs are designed for Reolink security cameras ONLY.
PoE Makes Easier Wiring and Installation
A real plug and play network video recorder! It features PoE (Power over Ethernet), with a single network cable connecting each of your IP cameras to the NVR for both power supply and video signal transmission. Easy wiring – the wiring process can’t be simpler for DIY enthusiasts.
Plug and play, easy connection with Reolink PoE cameras.
It will automatically recognize Reolink 5MP/4MP WiFi cameras connected to the same router.
24/7 Continuous Recording
If you want 24/7 video recording or if you have multiple IP cameras to manage, this Reolink NVR is your best choice. Pre-installed 2TB HDD for 24/7 recording and monitoring. Support all cameras recording at the same time (up to 8 cameras). You can install an external hard disk drive via e-SATA for more storage (up to 4TB).
Pre-installed 2TB HDD
Up to 8 Cameras
Up to 4TB External HDD
Local and Remote Access & Control
For local access and control: Connect the system to a monitor or an HD TV.
For remote access and control: Use free Reolink App on a mobile device, Reolink Client on a computer or a web browser (IE). The motion detection function will trigger alerts and send you notifications and emails, allowing you stay connected from anywhere.
iPhone, Android Smartphones
Reolink App, IE Browser, Reolink Client (Windows/Mac)
Reolink PoE NVR 8 Channel Review
Design
The NVR measures 10.91 x 3.82 x 3.82 inches—about the size of a standard cable box—and it houses a 2TB hard drive. The front control panel features a handful of navigational buttons, though you’ll undoubtedly perform most of these functions through the on-screen interface using the supplied two-button mouse. Along the bottom is a single USB port.[ Further reading: The best home security cameras ]
Ports & storage
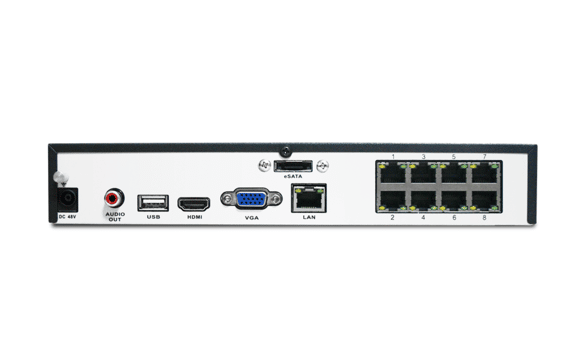
The rear panel includes both an HDMI and a VGA port (so you can connect the NVR to either your HDTV or a computer monitor), an audio out, a USB port (in case you want to backup footage to another drive), and a LAN port. Most importantly, there are eight PoE (power-over-ethernet) ports for Reolink cameras (the NVR won’t work with any other brand). There’s also an e-SATA port for connecting up to a 4TB external hard disk if you have particularly voracious storage needs.
Setup
Step 1: Plugin NVR
The Reolink NVR lives up to its plug-and-play promise. Just connect it to the monitor of your choice—an HDMI cable ships with the unit, but it you’ll need to scare up your own VGA cable if you choose to go that route—plug it into your router using the supplied ethernet cable, and power it on. Hook the mouse up to one of the USB ports, and, if you’re using a camera with a built-in mic, connect a speaker to the audio out.
Step 2: Connect with camera
Next, you’ll connect your Reolink cameras. Because the NVR supports PoE, electrical power is supplied over the network cable; you don’t need to use your cameras’ separate power source. This significantly reduces cable clutter as you set up multiple cameras around your home or business: You’ll only have to thread a single network cable from each camera back to the NVR.
Step 3: App
The first time you start up the NVR, a setup wizard prompts you through the process of creating a password, setting an access level, and configuring various camera and network settings.
Live view is the default display mode, and once you finish the setup process you’ll see all of your connected cameras The motion-detection options here are similar to those found on Reolink’s mobile app and desktop client.
When the camera detects motion, it will perform up to three actions based on your selections:
- Send an audio warning: the NVR will emit an alarm tone to ward off an intruder
- Send an email alert: the NVR will send you an email when motion is detected. You can have a snapshot of the triggering event sent as an attachment.
- Trigger recording: Depending on your configuration, one or more cameras will begin recording video.
Reolink PoE NVR 8 Channel customer review
This is a review of the model RLN8-410-E NVR.
This thing is actually quite amazing when you consider the technology you get for the price. Even 5 years ago this was cutting edge technology, but now it is available at electronic-novelty prices. As someone who remembers a time when 10MB hard drives were state of the art, just the fact that this comes with a 2TB hard drive is mind blowing.
One of the fairly neat aspects is that they’ve created this miniature Linux image where they rolled their own graphical user interface that works surprisingly smooth and is full of well though out details.
That was the good. The bad:
They rolled their own graphical user interface. It’s very of rough around the edges. I really though the device would be more web-based.
The web interface is essentially non-functional. This is odd because the web interface on the cameras is actually not very terrible.
Event playback via the web interface sucks. It simply fails to play back motion detected content most of the time. Works sometimes, but majority of the time it does not. It can stream live video fine, oddly enough.
You have to configure the cameras/channels via the local console. There does not appear to exist a way to do this via the web interface. While on the topic of cameras/channels, in the user interface the tag/name of the camera is ignored and all the channels are named CH01-08.
Local console text input is … goofy. Everything is done via mouse. There is only one USB port in the back so by design the keyboard is not really an option.
The playback control sucks. Current position is a yellow on white indicator. What in the hell? Also in playback mode there is no real visual indicator of what’s going on. Is the video paused or is there just nothing happening? Some sort of frame/time reference would help greatly.
Playback console can not be re-positioned which means that it blocks all OSD text if the text is on the bottom of the camera frame.
Overall though, this thing does what it claims to be able to do, albeit with some fairly sharp edges.
Editor’s recommendations
- Amcrest vs Swann Home surveillance camera – how easy to install?
- ANNKE vs Swann 8Ch 4K PoE security camera – do they have night vision?
- ANNKE 4K PoE security camera system review
- Ring floodlight cam HD security camera with built-in floodlights two-way talk and siren alarm
- Ring Floodlight Camera installation instructions- DIY home security

