Blink camera system has gained popularity for many features like view live streams, motion clips, or arm and disarm your system through select Alexa-enabled devices. It allows you to record and view in up to 1080p HD video during the day and with infrared HD night vision after dark. You can use activity zones to choose where motion is detected so you receive the alerts that matter. Keep hundreds of clips stored up to a year with no monthly fees or service contract required. Even you can talk to visitors through the Blink camera app on your smartphone or tablet. How to use Blink camera app?
How to setup Blink camera app?
Blink setup is easy, but please follow these steps in order. Now let’s get started!
Setup Sections
I. Installing the Blink app & Creating your Account
II. Setting up the Sync Module
III. Adding camera(s)
I. Installing the Blink App & Creating your Account
1. To download the free app or to update to the latest version, use the appropriate button below for your device.


If you’ve already downloaded the Blink app, make sure you’re on the latest version.
- On iOS, tap the Updates button in the bottom corner of the App Store app. If Blink has an available update, tap the Update button.
- On Android, tap the curtain menu in the top left corner of the Play Store home screen. Choose “My apps & games” and make sure you are on the “Installed” tab. Any apps that have an update available will appear at the top of this list.
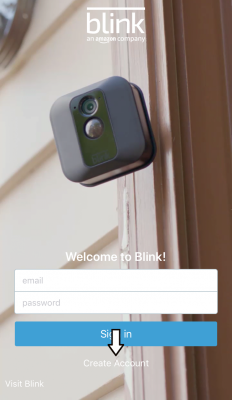
2. Launch the Blink App and tap on Create Account.
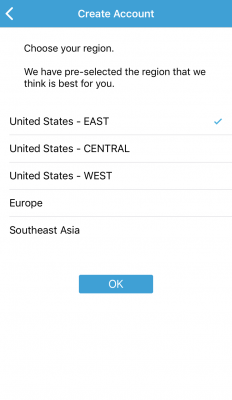
3. You will then be asked to Choose your region. This is important because it determines that your systems connect to the right server. The closest region to your location will be pre-selected and then tap OK.
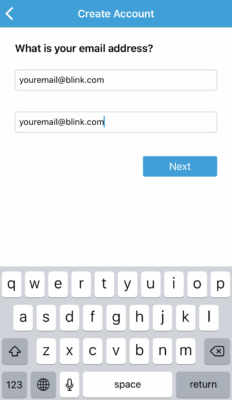
4. Enter your email address in both fields and select Next.
5. Then create a new password. Make certain identical information is typed in both fields and hit Create Account.The password requirements are listed at the bottom of the screen.

6. The Verify Your Email screen will then display. Your new account is created; however, you must check your email for activation instructions. You also have the option to have this email resent by hitting the Resend Email button at the bottom.
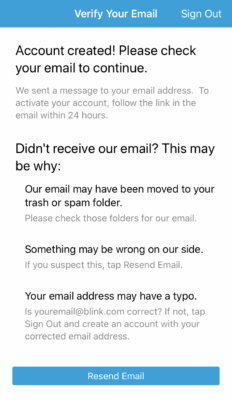
If you don’t see this email message in your inbox, please check your spam or trash folders. Once you receive the email hit VERIFY MY ACCOUNT.
7. A confirmation screen will open in your browser stating your account has been verified.

You will then be able to proceed to the next step of setting up your sync module.
II. Setting up the Sync Module
Thanks to Blink’s wire-free design, the Sync Module is the only part of the system that will need to be plugged in!
You can also follow our video guide here!
1. On the Home screen Tap the Blink + icon to begin.

2. Tap the first Blink wireless camera system option. A system consists of a Sync Module and one or more cameras.


3. Next a screen will prompt you to scan the QR code or manually enter the serial number on the device.

4. Give your system a name such as “Home” or “Office” and then tap Done.

5. The Sync Module screen will instruct you to plug in your camera and then wait for the lights to display, with the blue light blinking. Once this occurs tap on Discover Device.

6. The screen will then prompt you with “Blink” Wants to Join Wi-Fi Network “BLINK-XXXX”?

7. Tap Join and chose the Wi-Fi network that’s the same used in your existing system.

8. Shortly after that, you’ll receive a message saying “Sync Module added!”. Your Sync Module should now display solid blue and green LEDs. Once you receive that message, tap Done.

III. Adding Camera(s)
You will add your camera(s) one at a time. However, with Blink’s simple setup and multi-camera compatibility, you can easily add cameras to your system at any point down the road should you choose to start with one or purchase more later.
Note: The Blink Mini doesn’t require a sync module and can operate as it’s own separate system or be added to an existing. The following instructions apply to non Mini cameras.
1. Now you’ll be at your Blink home screen. Go ahead and tap the + icon.

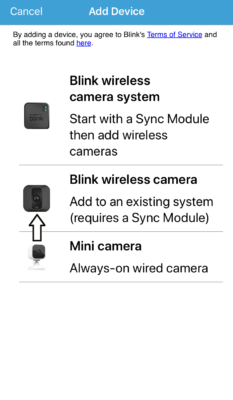
2. At the Add Device screen select the second option “Blink wireless camera”.
3. A screen will prompt you to scan the QR code or manually enter the serial number on the device.

4. In the “Select a System” screen add your camera to the existing system you already setup.

5. While your camera is added, the Blink app will show you some helpful tips for positioning your camera. Once it’s added successfully, tap “Done”.
*For XT2 camera ONLY – at this point you will get an extra screen (shown below) that will ask you to grant the Blink App access to your microphone. This is required to use 2-way audio and talk to whoever you see on camera.


6. Now you are back at the main screen of the Blink app. You’ll see some arrows pointing out options with your newly added camera.
 |  |
 |  |
- The camera is named after the serial number by default. Tap on the serial number at any time to change the name.
- The top right icon is the camera settings. This is where you can find information and adjust specific settings. Read more about camera settings here!
- The bottom left is the icon for Live View. This will give you a live stream in real time of whatever this camera is looking at.
- Next, tap on the Photo icon in the bottom right. This will take a photo of whatever this camera is looking at. That way, you have visual representation of where this camera is located.
To add more Blink cameras, tap on the same “Add” button and walk through the same steps under part III. Adding camera(s)

Now that you have connected everything to your account, check out our Using Your Blink System section for help with mounting your cameras and an introduction on how to use the app and all of the features of your new Blink system like using live view, arming your system, and configuring notifications on your mobile device.
How to Use Two-Way Audio
Our new Mini and XT2 cameras have two-way audio. Here is a guide to help use this new feature.
First, tap on the Live View button for any of your eligible cameras. This button is in the bottom left corner of the camera photo.

While you’re in Live View, you’ll see a round “Talk” button in the bottom left portion of the app.

To use two-way audio you must press and hold on this button. Once you press the button wait 1-2 seconds, then begin speaking. Your voice will come out through the speaker on the bottom of your XT2 camera or the top of your Mini!
When you’re done speaking, we recommend taking your finger off the Talk button instead of holding it for the entire conversation.
After 5 minutes, your Live View will stop and you’ll have to re-initiate another Live View session.
How to use Blink camera app to avoid alerting motion on Pets?
The Blink system is designed to capture motion based on heat moving across the field of view of your Blink camera. The system will often detect motion from pets walking in front of the camera. Using the Sensitivity setting in camera settings, you can make adjustments to fine tune the system to avoid alerting pet motion.
This process will take some ‘guess and check’ to determine the best sensitivity value for your Blink system depending on camera placement and size of your pet(s).
Each camera has an individual sensitivity setting.
1. From your home screen, tap the settings slider ![]() next to the camera you want to adjust.
next to the camera you want to adjust.
2. Scroll down to Sensitivity and move the slider a small distance toward L, for Low. Tap Save to save this setting and walk out of the frame of view of this camera.
3. From the home screen, you can arm the system to enable motion detection.
Now you must convince (or wait for) your pets to walk through the field of view of this camera (treats may be helpful). If your pets can walk through the field of view of the camera when the system is armed and you do not receive a motion alert, then you have successfully adjusted the system to a level where your pet will not trigger a motion alert. To ensure you haven’t turned down sensitivity too low that a person would not be detected, walk past your camera and check that you receive a motion alert. If you do, your system is optimized to let your pets roam freely and still alert you when there is motion you want to know about.
If your pet still triggers a motion alert, you can return to camera settings to lower the Sensitivity and check after each adjustment to perfect this setting. If the camera fails to alert on motion after you have walked through the frame, you will want to ensure that you increase motion sensitivity. Adjusting and then sending a pet and person through the camera field of view should help you to fine tune the setting.
How to Use Customizable Activity Zones with XT2 and Mini?
The Blink XT2 and Mini cameras have improved activity zones! In this article we’ll cover how to use them. (This feature is NOT part of indoor or XT cameras, only XT2 and Mini)
First you’ll want to go into camera settings of your camera.

Next, scroll down and select activity zones.

Now that we are in Activity Zones, you’ll see two new options down bottom. One that says Basic and one that says Advanced.
Basic is the same activity zones that are available on all Blink cameras.

Tap on Advanced. You’ll see the camera photo zoom-in and many more zones appear. You can now tap and drag to move the photo and select any zones you want.

Like before, the zones selected are the areas you DO NOT want to be triggered by motion detection.

Once your zones are selected, tap Done in the upper right-hand corner to save your selection.
How Can I Receive Notifications of Motion Detection?
Your Blink system can send an alert to your mobile device when motion is detected. Ensure you have armed your system for motion detection by following our article here. Verify that your Blink system is recording clips by viewing your clips roll, follow our instructions here. If your system is armed for motion and generating clips, you can enable notifications in your device’s Settings.
iOS users:
Settings>Notifications>Blink
Ensure you have Allow Notifications On and select the notification types you would prefer.
Android users:
Settings>Notification Center>Blink
Ensure you have Allow notifications On and select the notification types you would prefer.
Please note you will not receive notifications when you are on your Blink Clip Roll screen. To test notifications, head to the Blink app home screen, ensure your system is armed and then trigger motion on your camera.
Please note that you must be signed in to the Blink app to receive notifications on your mobile device.
How to Enable Temperature Alerts from Blink camera app?
This article will show you how to enable Temperature Alerts* and calibrate the thermometer of the camera. This is not available for Blink Mini cameras since they don’t use batteries.
1. To enable Temperature Alerts, tap the settings icon (this is the slider icon ![]() located above your cameras thumbnail picture on the main screen). Temperature Alerts are set up on a camera by camera basis.
located above your cameras thumbnail picture on the main screen). Temperature Alerts are set up on a camera by camera basis.
2. Under the Monitoring section, Tap where you see “Temperature”.
3. You will now be at the Temperature screen for that camera. Tap the toggle next to “Enable Temperature Alert” to turn on alerts.
4. Set your desired temperature thresholds and you’re done! You’ll want to repeat this process for any other cameras that you wish to receive Temperature Alerts from.
Calibrating your camera’s thermometer:
You’ll also notice the section called “Calibrate” on this screen. If you find that your camera’s temperature reading isn’t accurate, you can use this to calibrate it. To do this, place your camera near a thermometer and leave the camera there for at least 15 minutes. After that, adjust the camera’s temperature to match your thermometer by tapping the plus or minus icons.
*Please note that Temperature Alerts is in BETA currently. As a BETA feature, you may encounter bugs but we are constantly working on this.
How Do I Delete Motion Clips via Blink camera app?
From the clip list, you can delete unwanted motion clips to save storage space.
From your home screen, tap the Clip Roll icon ![]() to view all of your motion clips. There are multiple ways to delete your clips in the Blink app.
to view all of your motion clips. There are multiple ways to delete your clips in the Blink app.
I. Deleting individual clips without viewing them
II. Deleting individual clips while viewing them
III. Deleting multiple clips at once
IV. Deleting clips on Android
I. Deleting individual clips without viewing them
To do this, swipe from right to left on the clip that you’d like to delete. The clip will then show Delete next to it, which you can then tap. You will not be prompted to confirm, so make sure that you really want to delete the clip.
Note: Swiping right to left in a single quick motion will delete the clip without the Delete option appearing, so use caution when performing this function.

II. Deleting individual clips while viewing them
From the clip list, tap the clip you would like to view and delete.
Watch the clip to verify you want to delete that clip. There is not an option to recover deleted clips, so be careful. Once you have verified that this is the clip you would like to delete, tap anywhere on the video that is playing, and you can tap Delete in the bottom left hand corner of that clip. You will be asked to confirm this action. Tap YES to delete.
III. Deleting multiple clips at once
To delete multiple clips at once, tap on Edit and then tap on the clips you want to delete, then tap Delete in the bottom right hand corner. You can also use Mark All to select all and delete all of your clips at once.
IV. Deleting clips on Android
As of version 1.4 of the Blink app for Android, this process has changed slightly. This change will only be seen in Android.
From your home screen, tap the Clip Roll icon to view all of your motion clips.
Tap and hold a clip and it will become selected.
You will now see the option to delete it by tapping the icon.
You can select additional clips by tapping on them or choosing the Select All option.
How To Save Live View on XT2 and Mini Cameras?
With the Blink XT2 and Mini cameras, you can now record and save your Live View session. Saved Live Views count toward your 7,200 seconds of cloud storage, so you will want to be aware of your storage capacity and how clips are deleted. Blink Mini requires a subscription or use of the upcoming on-site storage option to store Live Views and clips.
To save Live Views:
First, tap on the Live View button for any of your Blink cameras. This button is in the bottom left corner of the camera photo.
While using Live View on your XT2 camera, you’ll see the “Save” and “Discard” options below the streaming video.
If you tap on “Save”, your current Live View session will be saved and you can find it in your clip folder to watch, share, or save to your phone’s memory.

You will notice in your clip roll, saved Live View and Motion Clips each have a different icon, to help tell them apart.
Tap Filter to select which camera’s media will be shown.
Alternatively, you can enable the “Save all Live Views” setting.
To do this, tap on the system icon at the bottom right of the home screen.

Then select the system under System Settings at the bottom.

You’ll see “Save all Live Views” at the bottom of the following screen.
Tap on the toggle to turn this on.
Note: If your Blink app is closed before you exit Live View, the clip is saved automatically.

With Live View, you can record up to 5 minutes at a time. After that, you’ll have to initiate a new Live View session.
Blink Mini requires a storage option to save live views. Currently storage is cloud only, but an on-site storage option will be available soon.