How are you going with your Netgear Orbi mesh WiFi system? Does your Orbi WiFi network becomes unstable, random reboots, or WiFi connectivity problem? Are you getting this after applying new Firmware Update? Our Netgear Orbi setup tips with existing router will resolve your issue. Also find how to do Netgear Orbi setup for brightness as well.
Netgear Orbi setup tips with existing router
Find here the 3 main Netgear Orbi setup tips with existing router –
Step 1 : Unplug everything and reconnect
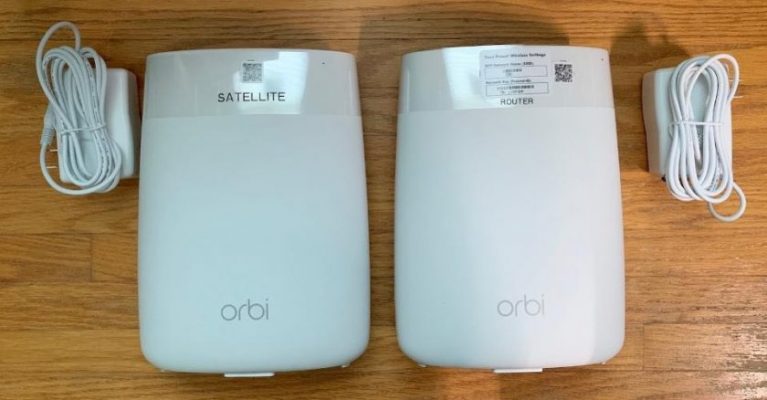
Unplug your modem and remove and replace the backup battery if it uses one. Plug the modem back in. Connect your modem to the yellow Internet port on your Orbi router using the included Ethernet cable. Connect your Orbi router to a power source. If the Power LED on the back of the Orbi router does not light, press the Power On/Off button.
The following video demonstrates these steps:
Step 2 : Wait till power up
Wait for the Orbi router’s ring LED to light solid white and then pulse white. Place the Orbi satellite in the middle of your house to get the best WiFi coverage. Connect the Orbi satellite to a power source. If the Power LED on the back of the Orbi satellite does not light, press the Power On/Off button.
Wait for the Orbi satellite’s ring LED to light solid white, then pulse white, and then pulse magenta. The Orbi satellite’s ring LED might pulse magenta for up to one minute while the satellite attempts to sync with the Orbi router. After the Orbi satellite’s ring LED pulses magenta, it lights one of the following colors for 10 seconds then turns off:
- Solid blue. The connection between the Orbi router and Orbi satellite is good.
- Solid magenta. The Orbi satellite cannot connect to the Orbi router. Move the Orbi satellite closer to the Orbi router.
- Solid amber. The connection between the Orbi router and Orbi satellite is fair. Consider moving the Orbi satellite closer to the Orbi router.
- Note: If the Orbi satellite’s ring LED is still pulsing magenta after about one minute, and you already moved the Orbi satellite closer to the Orbi router, press the Sync button on the Orbi router and on the Orbi satellite.
- If the Orbi satellite successfully syncs with the Orbi router, the Orbi satellite’s ring LED pulses white, then lights solid blue to indicate a good connection, and then turns off.
Step 3 : Connect with your devices
- Connect your computer or mobile device to the Orbi router or satellite with an Ethernet or WiFi connection.
Note: To connect with WiFi, find the preset WiFi network name (SSID) and password on the label on the Orbi router or satellite and connect to that network from your WiFi-enabled computer or mobile device. - Download the Orbi app or visit http://orbilogin.com to set up your Orbi WiFi network. The Orbi router’s ring LED turns off after the setup is complete.
- After you turn on the satellite’s LED lighting, you can set its brightness percentage.
Netgear Orbi setup tips – LED lighting brightness
- Launch a web browser from a computer or mobile device that is connected to your Orbi network.
- Enter orbilogin.com.
A login window displays. - Enter the router admin user name and password.
The user name is admin. The password is the one that you specified the first time that you logged in. The user name and password are case-sensitive.
The BASIC Home page displays. - Select Attached Devices.
The Attached Devices page displays. - Select your satellite.
The Edit Device page displays. - Make sure that the LED lighting is turned on.
- If the LED lighting is turned off, in the LED On/Off section, click the LED On/Off slider to turn the LED on.
The top and bottom LEDs turn on. - Select an LED lighting brightness percentage from the LED Lighting Brightness menu.
- Click the Apply button.
Your settings are saved.
Netgear Orbi setup tips after firmware upgrade
If your Orbi WiFi network becomes unstable, random reboots, WiFi connectivity problem, after applying new Firmware Update, following steps will solve your issue.
- Verify that Orbi/Satellites Firmware are on the same version
- Turn off all Orbi, Satellites, and ISP modem/router
- Disconnect all LAN cables from Orbi LAN ports
- Turn on ISP modem/router
- Turn on Orbi (Verify that LAN cable from ISP is connected to Orbi yellow WAN port)
- Login to Orbi, enable telnet, telnet into the Orbi, and type these commands:
- config default
- config commit
- reboot
Setup Orbi via WiFi. Skip all Satellites settings steps. Once you’re done with Orbi setup, type reboot command at Orbi terminal.
Next…
- Wait for 15 minutes and verify that your Orbi network stays up
If all is well, then…
- Disconnect all LAN cables from Satellites
- Turn on 1st Satellite
- Login into the Satellite’s debug.htm page and tick the telnet box (http://satellite-ip/debug.htm)
- telnet into Satellite and type:
- config default
- config commit
- reboot
Wait for 15 minutes and verify that Orbi WiFi network is still holding up. If all is well, repeate the same steps with all remaining Satellites. Once everything is up and running, then start adding each LAN client back, one at a time, to your network. Once everything is up and running, please verify that Orbi/Satellites backhaul signals are within dBm range to ensure stability.
To ensure Orbi/Satellites are in sync with each other after each Firmware Update, telnet into each Satellite, and execute these 3 commands at each Satellite’s telnet terminal after every Firmware Update, no exception.
- config default
- config commit
- reboot